
Gluten-Free Artisan Bread: A Culinary Journey Worth Taking
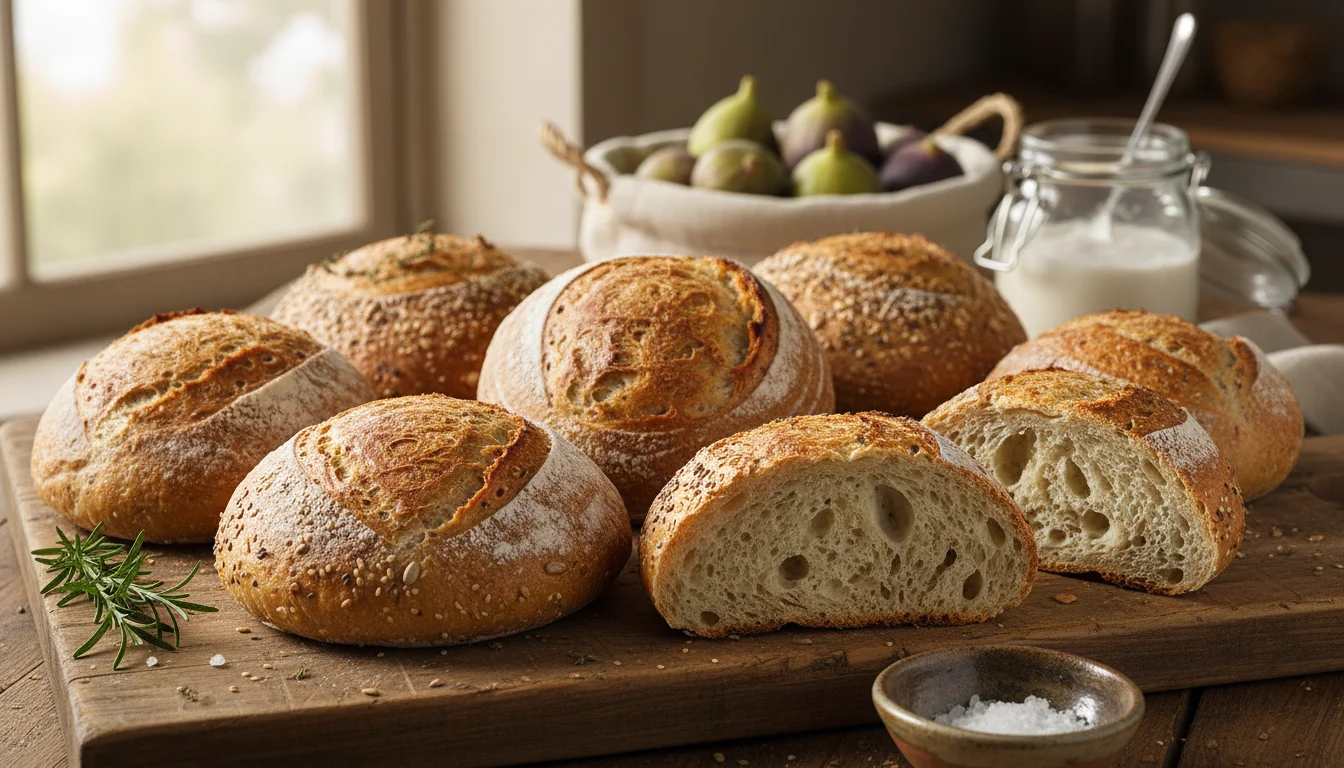
Imagine the perfect slice. A crackling, golden crust that gives way to a soft, airy interior, tinged with that subtle, complex flavor only truly great bread possesses. For years, achieving this with gluten-free baking felt like a distant dream. But I’m here to tell you, that dream is now a delicious reality. This isn’t just bread; it’s a revelation. It’s the kind of gluten-free artisan bread that makes you forget all about gluten. Seriously.
My own journey with gluten-free baking was, let’s say, eventful. Frustration was a constant companion. Dry, crumbly loaves were the norm. Then, after countless experiments and late nights in the kitchen, I stumbled upon a combination of flours and techniques that changed everything. This recipe is the culmination of that hard work, refined to deliver a spectacular gluten-free artisan bread that will have everyone asking for seconds, regardless of their dietary needs.
| Prep Time | Cook Time | Total Time | Servings | Est. Calories |
|---|---|---|---|---|
| 20 minutes + 12-18 hours proofing | 45-55 minutes | 13.5 – 19.5 hours | 1 loaf (approx. 12 slices) | ~150 per slice |
Why This Gluten-Free Artisan Bread is a Game-Changer
- Incredible Texture: Achieves that coveted chewy interior and crispy crust, a rarity in gluten-free baking.
- Deep Flavor: Fermentation adds a wonderful depth of taste that mimics traditional sourdough.
- Remarkably Simple: Despite its sophisticated outcome, the process is straightforward and forgiving.
- Versatile: Perfect for toasting, sandwiches, or simply enjoying with a smear of butter.
Ingredients Notes: The Secret to Success
The right ingredients make all the difference in creating exceptional gluten-free artisan bread. I’ve tested extensively to find the perfect blend.
- Gluten-Free All-Purpose Flour Blend: Look for a blend that contains a good mix of rice flours, tapioca starch, and potato starch. Brands like King Arthur Baking or Bob’s Red Mill 1-to-1 Baking Flour work well. Avoid blends that are too heavy on bean flours.
- Psyllium Husk Powder: This is your binder. It mimics the elasticity gluten provides. Make sure it’s powder, not whole husks.
- Instant Yeast: For a reliable rise.
- Salt: Essential for flavor and controlling yeast activity. Use fine sea salt.
- Warm Water: Not hot! Too hot will kill the yeast. Aim for around 105-115°F (40-46°C).
- Sugar or Honey: A small amount feeds the yeast and aids browning.
- Olive Oil or Melted Butter: Adds richness and helps with moisture.
Gluten-free artisan bread 1
Crafting Your Masterpiece: Step-by-Step Instructions
Phase 1: The Dough Development
- In a large mixing bowl, whisk together 3 cups of your chosen gluten-free all-purpose flour blend, 2 tablespoons of psyllium husk powder, 1 teaspoon of instant yeast, and 1 teaspoon of fine sea salt. Make sure everything is thoroughly combined.
- In a separate bowl or measuring cup, combine 1 ½ cups of warm water (105-115°F), 1 tablespoon of sugar (or honey), and 2 tablespoons of olive oil (or melted butter). Stir until the sugar dissolves.
- Pour the wet ingredients into the dry ingredients.
- Using a sturdy spoon or a stand mixer fitted with a paddle attachment, mix on low speed until just combined. Then, increase the speed to medium and beat for 5-7 minutes. The dough will be quite sticky and shaggy, more like a very thick batter than traditional bread dough. This is exactly what you want.
- Scrape down the sides of the bowl. Cover the bowl tightly with plastic wrap.
Phase 2: The Long, Slow Proof
- Let the dough rest at room temperature for about 1 hour, or until it looks slightly puffy.
- Now for the magic: place the covered bowl in the refrigerator for 12-18 hours. This slow, cold fermentation develops incredible flavor and improves the structure of your gluten-free artisan bread.
Phase 3: Shaping and Baking
- The next day, the dough will have risen and be full of bubbles. Generously flour a clean work surface.
- Gently scrape the dough out of the bowl onto the floured surface. It will still be quite sticky.
- Using floured hands, gently shape the dough into a round or oval loaf. Be careful not to overwork it. Think of it as coaxing it into shape.
- Prepare a piece of parchment paper by lightly oiling it or dusting it with gluten-free flour. Carefully transfer the shaped dough onto the parchment.
- Preheat your oven to 450°F (230°C) with a Dutch oven inside for at least 30 minutes. The Dutch oven is crucial for creating that steamy environment that leads to a fantastic crust.
- Once the oven and Dutch oven are fully preheated, carefully remove the Dutch oven.
- Lift the parchment paper with the dough and gently lower it into the hot Dutch oven.
- Place the lid on the Dutch oven and carefully put it back into the oven.
- Bake for 30 minutes with the lid on.
- After 30 minutes, remove the lid. The bread will have puffed up and started to color.
- Continue baking for another 15-25 minutes, or until the crust is a deep golden brown and the internal temperature reaches 205-210°F (96-99°C) on an instant-read thermometer.
- Carefully remove the bread from the Dutch oven (using the parchment paper to lift it out) and place it on a wire rack to cool completely. This is the hardest part – waiting!
Gluten-free artisan bread 2
Chef’s Crucial Tip: Resist the urge to cut into the bread while it’s still warm. The internal structure needs time to set properly. If you cut it too soon, it can become gummy. Patience truly is a virtue when it comes to excellent gluten-free artisan bread.
Variations and Substitutions
- Herbed Bread: Mix 2 tablespoons of finely chopped fresh herbs (rosemary, thyme, chives) into the dough during the initial mixing stage.
- Seeded Bread: Add 1/4 cup of your favorite seeds (sunflower, pumpkin, poppy, sesame) to the dry ingredients.
- Vegan: This recipe is naturally vegan if you use sugar and olive oil.
- Nutty Flavor: Substitute 1/4 cup of the all-purpose blend with finely ground almond flour for a subtle nutty note.
Storage and Reheating
Once completely cooled, store your in an airtight container or bread bag at room temperature for up to 3 days. For longer storage, wrap it tightly in plastic wrap and then in foil, and freeze for up to 3 months. Reheat slices in a toaster or a low oven (around 300°F/150°C) for a few minutes to revive their crispness.
Frequently Asked Questions
Can I use a different gluten-free flour blend?
While you can experiment, it’s best to stick to blends designed for baking that contain a mix of starches and lighter flours. Heavy or unusual blends may alter the texture significantly.
Why is my gluten-free bread so dense?
Density is often caused by not enough binder (psyllium husk here), overmixing after the initial hydration, or not allowing sufficient proofing time. Ensure your psyllium husk is fresh!
How do I get a crispy crust without a Dutch oven?
You can achieve a good crust by baking the bread directly on a preheated baking stone or steel. Place a shallow pan with boiling water on the rack below the bread for the first 30 minutes of baking to create steam.